Could you try to rename at 8 line Compressor to compressor?
The variable into which you import should be the same as the constructor.
I believe that should help.
Could you try to rename at 8 line Compressor to compressor?
The variable into which you import should be the same as the constructor.
I believe that should help.
I think I had tried that before, but I must have been wrong, because your suggestion seems to work. At least it got me further down the road ! Thanks
Thanks to your help, I think I’m nearly there with this library.
Now there’s one more question I’m having : how do I replace the content of the file to be uploaded by the output of my custom code.
It is a valid blob, but I tried to set the content of the blob to :
Files
listFiles
list itselfNone worked.
Wondering how I could feed that content to the uploader.
I’m not sure if that should work in this way. Because replacing the content of the file means direct access to the file system and as we know, this possibility does not exist in our case and in browsers in general.
I could offer to replace existed file fully. You can use Create File block with overwriting.
Regards, Dima
OK, that was the path I was looking into, but I was a bit afraid of that.
Indeed, if I understand correctly, I would need to:
I am not sure about the 3rd step, which seems not that elegant, but could you confirm that is what you had in mind ?
Or would there be an alternative way to run the first step differently, without triggering the upload component ?
Also, @Dima , could you clarify how that file creation happens ?
Because I tried this
And I am getting a 404 on the upload
What am I doing wrong ?
For the record, I really keep getting this error, even after having formatted my blob with a FormData using custom code.
There must be something wrong in the way I’m trying to use the Create File block like you suggested.
Also, I’m quite puzzled by the fact there is a binary
in the file path.
Hello @Nicolas_REMY!
I think the compression of the file should proceed as follows:
Could you please check and show me what is stored in the uploadedFile
?
Regards,
Alexander
Hi @Alexander_Pavelko ,
Thank you for your reply.
I understand that would be possible, but for many reasons it would be more desirable to perform the resize operation on the client side : if an image is to be used as a profile avatar which will end up weighing only 10 ou 20 kB, it’s kind of pointless to upload a huge 6 MB image from a smartphone. I was looking to avoid a waste of bandwidth and leveraging some very lightweight and efficient libraries aiming to do just that. I believe that’s why many other users are looking to do the same, as pointed out also in the links on top.
Here is the content of the uploadedFile variable, if that can help:
@Nicolas_REMY, I agree with you, it really is better to do it on the client. And you can create your own custom component to solve this issue. As an example, I’ve created this simple component with only one input. And when you select a file, it will compress it to the specified parameters and upload it to the server. And based on it you can create your own custom component with all the necessary features.
Here is all the code for the component:
define([
'https://cdnjs.cloudflare.com/ajax/libs/compressorjs/1.1.1/compressor.min.js'
], (Compressor) => {
const customHTML = '<input type="file" id="input">'
function compress(e) {
const file = e.target.files[0]
if (!file) {
return
}
new Compressor(file, {
maxWidth: 200,
maxHeight: 200,
success(result) {
Backendless.Files.upload(result, '/images/', true)
},
error(err) {
console.log(err.message)
},
})
}
return function CustomComponent({ component }) {
const elRef = React.useRef(null)
React.useEffect(() => {
const $el = elRef.current
$el.innerHTML = customHTML
const $input = $el.querySelector('input')
$input.addEventListener('change', compress, false)
}, [])
return React.createElement('div', {
className: 'my-custom-component-container',
ref: elRef,
})
}
});
Regards,
Alexander
Wow OK, thanks for that. Looks promising.
However, to go down that path, I need to understand how to customize the component.
Is there a documentation somewhere about how to set up properties, events and actions ? And/or is it possible to view the way the standard File Uploader is done, in order to build on it ?
Best regards
I made it this far:
component.json
{
"id": "c_d1e83236ff73c1fdd7223f359a0ce9e7",
"name": "ResizeAndUpload",
"description": "",
"showInToolbox": true,
"faIcon": "pencil-ruler",
"type": "custom",
"category": "Custom Components",
"properties": [
{
"label": "Max Width",
"name": "maxWidth",
"type": "number",
"defaultValue": "100",
"handlerId": "maxWidth"
},
{
"name": "maxHeight",
"label": "Max Height",
"type": "number",
"defaultValue": "100",
"handlerId": "maxHeight"
},
{
"name": "directory",
"label": "Directory",
"type": "text",
"handlerId": "directory"
},
{
"name": "buttonLabel",
"label": "Button Label",
"type": "text",
"defaultValue": "File Upload",
"handlerId": "buttonLabel"
},
{
"name": "accept",
"label": "Accept",
"type": "text",
"defaultValue": "image/*",
"handlerId": "accept"
},
{
"name": "overwriteFiles",
"label": "Overwrite Files",
"type": "checkbox",
"handlerId": "overwriteFiles"
},
{
"name": "backgroundColor",
"handlerId": "backgroundColor",
"label": "Background Color",
"type": "text",
"defaultValue": "#FFFFFF"
},
{
"name": "color",
"label": "Color",
"handlerId": "color",
"type": "text",
"defaultValue": "#000000"
}
],
"eventHandlers": [
{
"name": "onBeforeUpload",
"label": "on Before Upload",
"contextBlocks": [
{
"id": "files",
"label": "Files"
}
]
},
{
"name": "onUploadSuccess",
"label": "on Upload Success",
"contextBlocks": [
{
"id": "uploadedFiles",
"label": "Uploaded Files"
}
]
},
{
"name": "onUploadFail",
"label": "on Upload Failed",
"contextBlocks": [
{
"id": "error",
"label": "Error"
}
]
},
{
"name": "onFileNameAssignment",
"label": "File Name Logic",
"contextBlocks": []
},
{
"name": "onButtonLabelAssignment",
"label": "Button Label Logic"
}
],
"actions": [
{
"id": "Reset",
"hasReturn": false,
"inputs": [],
"label": "resize & upload"
}
]
}
bundle.js
define([
'https://cdnjs.cloudflare.com/ajax/libs/compressorjs/1.1.1/compressor.min.js'
], (Compressor) => {
const customHTML = '<label for="myfile">Select a file:</label><input type="file" id="myfile" name="myfile" accept="">'
function compress(e) {
const file = e.target.files[0]
if (!file) {
return
}
new Compressor(file, {
maxWidth: maxWidth,
maxHeight: maxHeight,
success(result) {
Backendless.Files.upload(result, directory, overwriteFiles)
},
error(err) {
console.log(err.message)
},
})
}
return function CustomComponent({ component }) {
const elRef = React.useRef(null)
React.useEffect(() => {
const $el = elRef.current
$el.innerHTML = customHTML
const $input = $el.querySelector('input')
$input.addEventListener('change', compress, false)
}, [])
return React.createElement('div', {
className: 'my-custom-component-container',
ref: elRef,
})
}
});
But now I don’t get how I can really link the values I can set in the properties and the variables in the bundle.js.
At least when things are hardcoded, it runs fine, which is already a huge step forward.
And I would also need to see where the various handlers I defined can be effectively fired. I used the same names as those used in the app’s main.js, for example onFileNameAssignment, onUploadSuccess or onBeforeUpload, but they don’t seem to run.
In case you need to look into it, my app id is D7075715-5086-625A-FFAB-39C2F40FB200 and I made a page with this logic called test-page
.
Custom components are a new feature and, unfortunately, the documentation for them is not yet ready.
But you can work with them just as if you were working with a react app.
For example, here’s how you can add two inputs for entering width and height
(it’s not a good solution, just as an example):
define([
'https://cdnjs.cloudflare.com/ajax/libs/compressorjs/1.1.1/compressor.min.js'
], (Compressor) => {
const customHTML = (`
<input label="width" id="width">
<input label="height" id="height">
<input type="file" id="file">
`)
function compress(e) {
const file = e.target.files[0]
const $inputWidth = document.querySelector('#width')
const $inputHeight = document.querySelector('#height')
const maxWidth = $inputWidth.value || 200
const maxHeight = $inputHeight.value || 200
if (!file) {
return
}
new Compressor(file, {
maxWidth,
maxHeight,
success(result) {
Backendless.Files.upload(result, '/images/', true)
},
error(err) {
console.log(err.message)
},
})
}
return function CustomComponent({ component }) {
const elRef = React.useRef(null)
React.useEffect(() => {
const $el = elRef.current
$el.innerHTML = customHTML
const $inputFile = $el.querySelector('#file')
$inputFile.addEventListener('change', compress, false)
}, [])
return React.createElement('div', {
className: 'my-custom-component-container',
ref: elRef,
})
}
});
We already use this method to upload to the server.
success(result) {
Backendless.Files.upload(result, '/images/', true)
},
You can create a separate ‘Upload’ button to call it. And on success
you just unlock it.
Now you have unlimited possibilities to implement your project and experiment.
Regards,
Alexander
Thanks for the reply.
This is starting to become way too complicated. I don’t know how to work with a React app That’s one of the reasons I’m building the UI with UI builder !
Despite the possibilities being probably very powerful and the time spent, I’m afraid I’m going to have to call this one off. Thanks for the guidance.
Perhaps may I suggest that in the File Uploader component it could be nice to just implement an additional handler which is able to manipulate the file before upload to the server. That could be useful.
Hi all,
Just as a follow-up, here is how I ended up (partially) solving my issue.
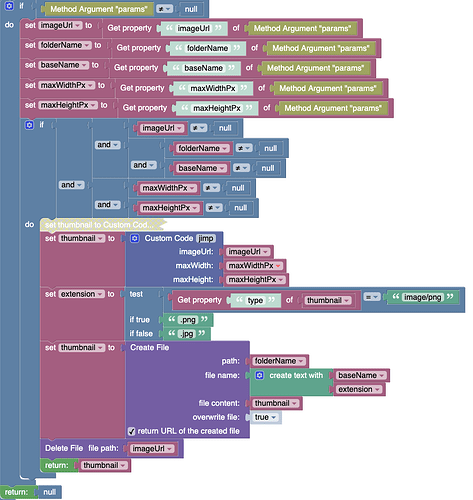
As discussed above, for the time being I abandoned the idea of resizing the image on the client, so I set about to doing it on the server, after the upload was successful. Of course this has the drawback of requiring the upload of a potentially large image and thus it takes a bit of time.
Anyhow, in case it helps someone further down the road, here is my logic for resizing the image on the server side:
Cloud Code method:
Detail of the jimp custom code:
const jimp = require ('jimp');
const thumb = await jimp.read(imageUrl)
.then(image => {
return image.scaleToFit( maxWidth, maxHeight ).quality(70).getBufferAsync(image.getMIME());
});
return thumb;
Requires that Jimp and its dependencies be installed on the server side (as described by Mark here: How to use NPM modules in Codeless logic in API Services, Event Handlers and Timers)
Here is my client side solution using the Custom UI Component Builder for anyone who is interested. The build was done using the Backendless blog post as a reference. I used this link to download and install compressorjs as a third party library (following the blog post instructions) for my Custom Component.
Here is my index.js code for the Custom UI Component. For my purposes, I wanted to hide the upload button for a consistent appearance, show an image preview, and compress the file size before upload and rename the file which is included here and will be expanded on below. I’m a self-taught tinkerer so apologies on the front end if the code is a bit messy or redundant!
import { useState } from 'react'
import Compressor from './lib/compressor';
export default function MyCustomComponent({ component, eventHandlers }) {
const [selectedFile, setSelectedFile] = useState();
const changeHandler = (event) => {
setSelectedFile(event.target.files[0]);
const file = event.target.files[0];
new Compressor(file,{quality:0.6, success(result) {
const lastIndex = file.name.lastIndexOf('.');
const after = file.name.slice(lastIndex);
const fileName = component.filenamePrefix.concat(after);
const myRenamedFile = new File([result], fileName);
eventHandlers.imageSelected({ imageFile: myRenamedFile })
}, error(err) {
//alert(`${err.message}`);
console.log(err.message);
},
});
};
return (
<input type="file" className="hideUploadButton" name="file" onChange={changeHandler} accept="image/*" />
)
}```
Here is the style index.less code used to hide the upload button.
.hideUploadButton {
display: inherit;
opacity: 0;
//background-color: #E79137;
width: 100%;
height: 100%;
Under Properties of the Component Builder I use the following setting to allow input of a new filename using Codeless logic.
The image is renamed and then handed back to the imageSelected event in the Component Builder for use to update an overlaid image on the user interface with Codeless logic.
Hopefully this info will be helpful for someone!
I was trying to do the exact same thing for avatars. I ended up using https://crop.guide/. It is an added cost but brings a lot of additional features.
I hope this helps,
Tim
Super useful, guess we will try to do the same and also build this custom component.
I wonder, have you considered publishing this in the Backendless UI component marketplace? Seems like it could help a lot of people, useful for all apps where user adds a thumbnail profile pic!
Hi Tim, curious about your crop guide experience… was easy to add to your Backendless app? Might you spare a minute and describe the steps? Happy with the plugin, and can you recommend?