Hi @Alejandro_Tamonan,
the issue was fixed, but not released yet.
For now I can share with you instructions for the “Send a push notification from console using a push template” task:
For this task to be recognized as complete, the following conditions must be met:
- A device must be registered with Backendless. This has already been done in a previous task (from the
PUSH COMMANDER mission).
- A push notification template is created. This also has already been done in a previous task (from the
PUSH COMMANDER mission).
- A push notification sent from Backendless Console from a push template is delivered to your device.
Watch the video below for a demonstration of the steps required to complete this task:
Here is an instructions for the second task:
Task: Send a push notification from console with smart text
With this task you will send out a push notification with smart text using a push template with Backendless Console. The “Smart Text” feature lets you customize and personalize the content of the push notifications sent out by Backendless. Smart text can reference properties/columns of the Users table or the properties from all related tables.
For this task to be recognized as complete, the following conditions must be met:
- The
Users table has the name column, of type STRING.
- **Create a user account in the
Users table. (It is OK to do it in Console).
- Register a device for push notifications (using code). It is VERY important that the device registration is done AFTER a user is logged in in the app. Watch the video below for a demonstration and an explanation.
- Modify the
PushMission template to use smart text. The smart text must use the name property from the Users table.
- Send out a push notification to your device.
Watch the video below for a demonstration of the steps required to complete this task:
Third Task: Send a push notification from template using API
With this task you will send out a push notification using the API. The push notification is created from a template. You will use the code generated by Backendless Console, this makes it simpler as the code is automatically written to use the template and send a push notification from it.
For this task to be recognized as complete, the following conditions must be met:
- A device must be registered with Backendless. You can use the same app you used in the previous tasks.
- A push template must be used. You can use the same
PushMission template from the previous tasks.
- Use the
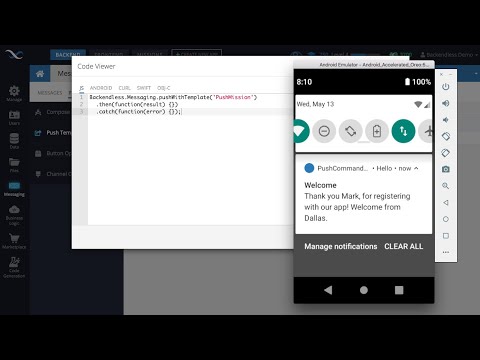
Show code icon as shown in the video below to get the API code for sending out a push notification.
- Use a programming language which any of the Backendless SDKs support (Android, iOS, JS, .NET).
- Send out a push notification using the code from (3) and make sure the device (or an emulator) receives it.
Watch the video below for a demonstration of the steps required to complete this task:
And the fourth, last task Send a push notification from template using API:
With this task you will send out a push notification using the API. The push notification is created from a template. You will use the code generated by Backendless Console, this makes it simpler as the code is automatically written to use the template and send a push notification from it.
For this task to be recognized as complete, the following conditions must be met:
- A device must be registered with Backendless. You can use the same app you used in the previous tasks.
- A push template must be used. You can use the same
PushMission template from the previous tasks.
- Use the
Show code icon as shown in the video below to get the API code for sending out a push notification.
- Use a programming language which any of the Backendless SDKs support (Android, iOS, JS, .NET).
- Send out a push notification using the code from (3) and make sure the device (or an emulator) receives it.
Watch the video below for a demonstration of the steps required to complete this task:
Regards,
Stanislaw


