Want to edit index.html in order to add Lottie animation files or MapBox map

Hi I tried to use the backendless file editor to edit a the index.html for a test page called “z_temp”. I’m trying to add a lottie animation which has the following code below.

But when I try to preview the page there’s no animation displayed. Is it not possible to insert scripts like this?

Thanks!

Hello @William_Lee

Unfortunately, this option is not yet available. But we are already working on a component that will make it possible to implement this functionality. As soon as the component is ready, we will notify you in this thread.

Regards,
Inna

Thanks Inna… Looking forward to it being released… I hope we can use it for MapBox and Lottie.

@William_Lee we are happy to introduce you Custom Code block, which makes creating Lottie animations possible.

Here a little example - link

Code in Custom Code block:

const resutl = await BackendlessUI.requireModule('https://unpkg.com/@lottiefiles/lottie-player@latest/dist/lottie-player.js')

const el = document.querySelector('.animation')

el.innerHTML = `
<lottie-player src="https://assets5.lottiefiles.com/datafiles/zc3XRzudyWE36ZBJr7PIkkqq0PFIrIBgp4ojqShI/newAnimation.json"  background="transparent"  speed="1"  style="width: 300px; height: 300px;"  loop  autoplay></lottie-player>
<lottie-player src="https://assets9.lottiefiles.com/datafiles/MUp3wlMDGtoK5FK/data.json"  background="transparent"  speed="1"  style="width: 300px; height: 300px;"  loop  autoplay></lottie-player>
<lottie-player src="https://assets1.lottiefiles.com/datafiles/HN7OcWNnoqje6iXIiZdWzKxvLIbfeCGTmvXmEm1h/data.json"  background="transparent"  speed="1"  style="width: 300px; height: 300px;"  loop  autoplay></lottie-player>
`

Also, don’t forget to add a block with class animation(you can change this class, it need only to found an element where we should render lotties)

Regards, Dima

1 Like

It looks so cool!
Thanks!

BTW I love the different editing styles like Terminal… Nice touch!
As a suggestion can you please add a word wrap option for the custom code editor…

Hello @William_Lee

Thanks for the suggestion, it makes sense.
I’ve created an internal ticket BKNDLSS-26437 to discuss the improvement with the team

Regards,
Viktor

1 Like

Hi Dima thanks for releasing this… but is it even possible to run this following particle animation effect with this control?

I’ve been working on this for the last several hours but haven’t had any luck. Can you please test to see if your component can handle this? I’m wondering if this only works with Lottie animations for some reason.


Btw the js file they are using for this particle effect is here. I posted a copy of this on my backendless file manager and tried to reference it from there but that didn’t work either. My App id is 721AC780-A565-8D74-FF75-5158A2EB5500 and the page I’m testing is called “Modal” in the “shipping.org” container.

Thanks!

Hi William,

Here’s a demo of the particles library in action in UI Builder:
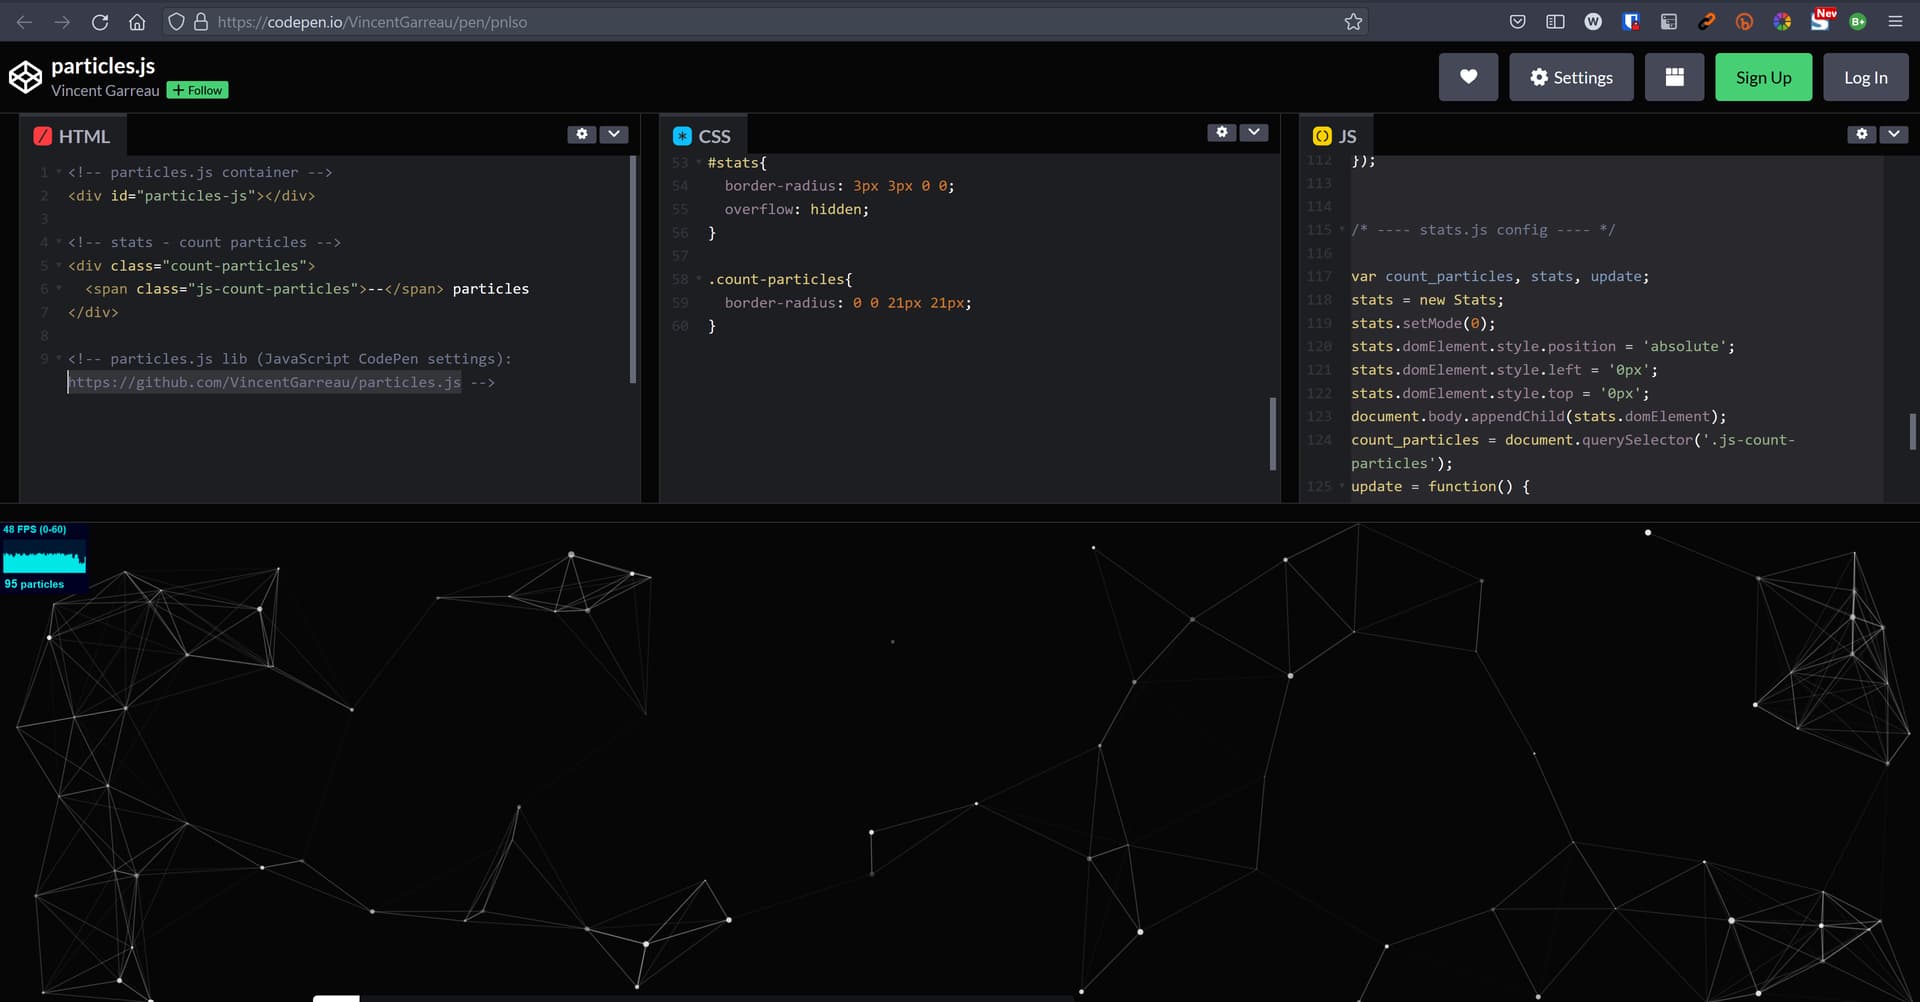
https://www.backendless.us/api/files/ui-builder/containers/default/index.html?page=particles

The implementation details are below:

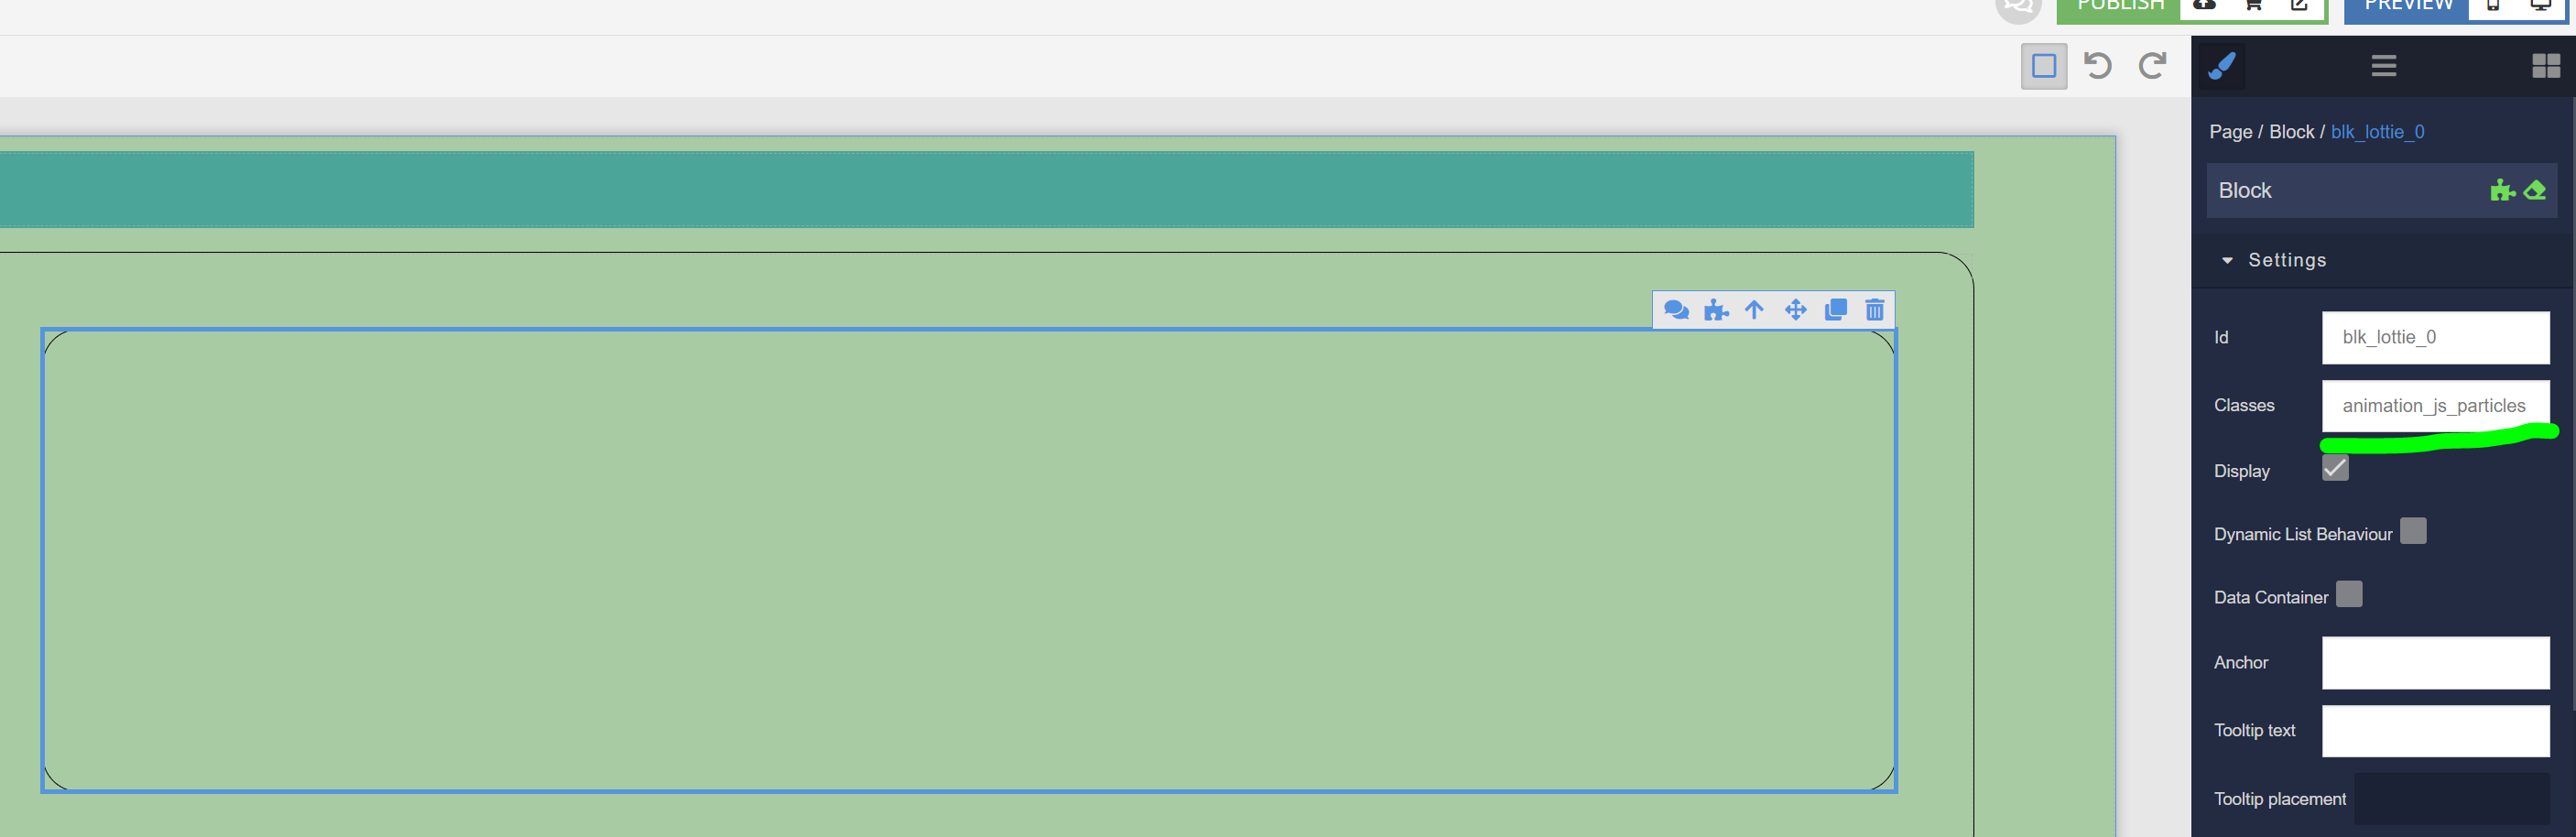
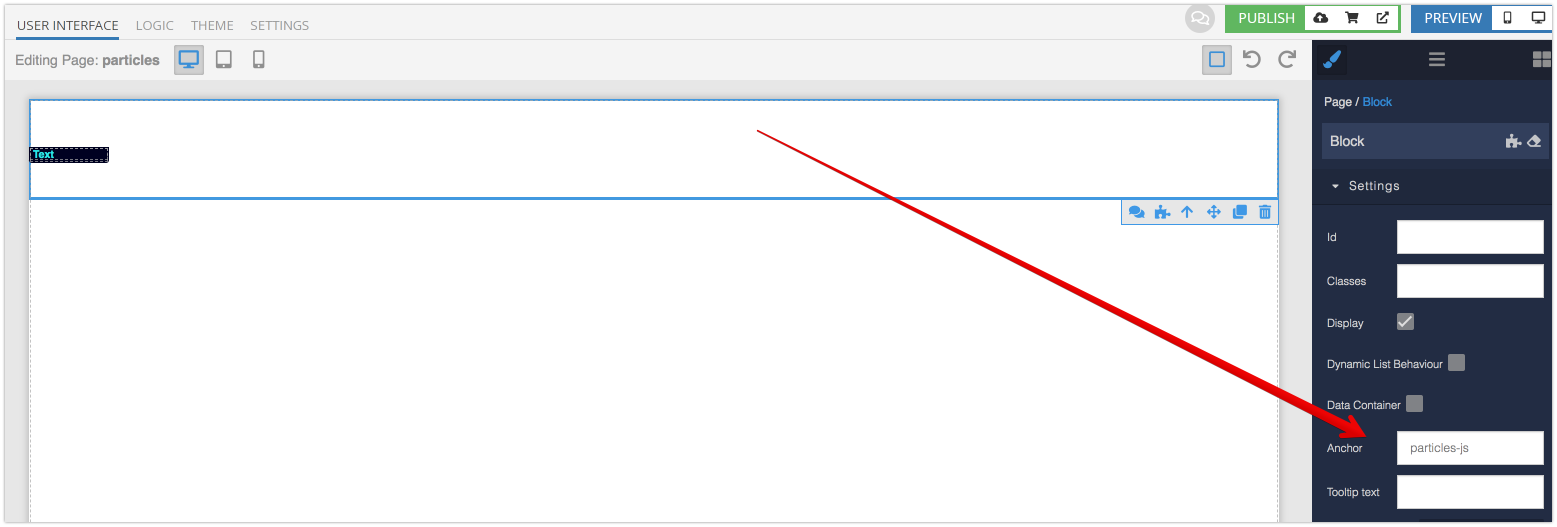
  1. Add a block to your page and assign the particles-js anchor (this will assign an id to your block (<div>):

  2. Add another block and assign the count-articles class to it:

  3. Add a text component inside of the 2nd block and assign the js-count-particles class:

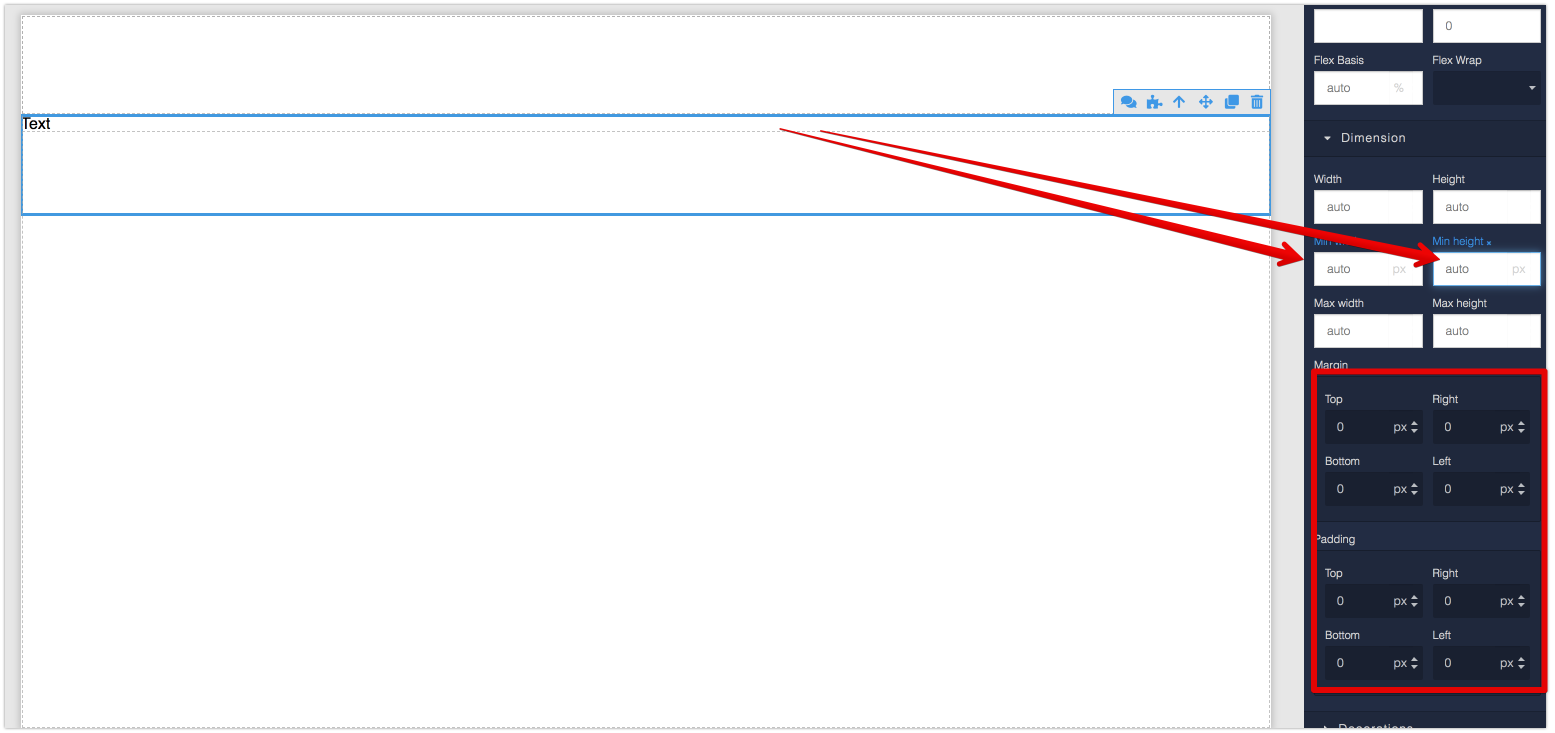
  4. Select the second block and remove min width/height, padding and margins:

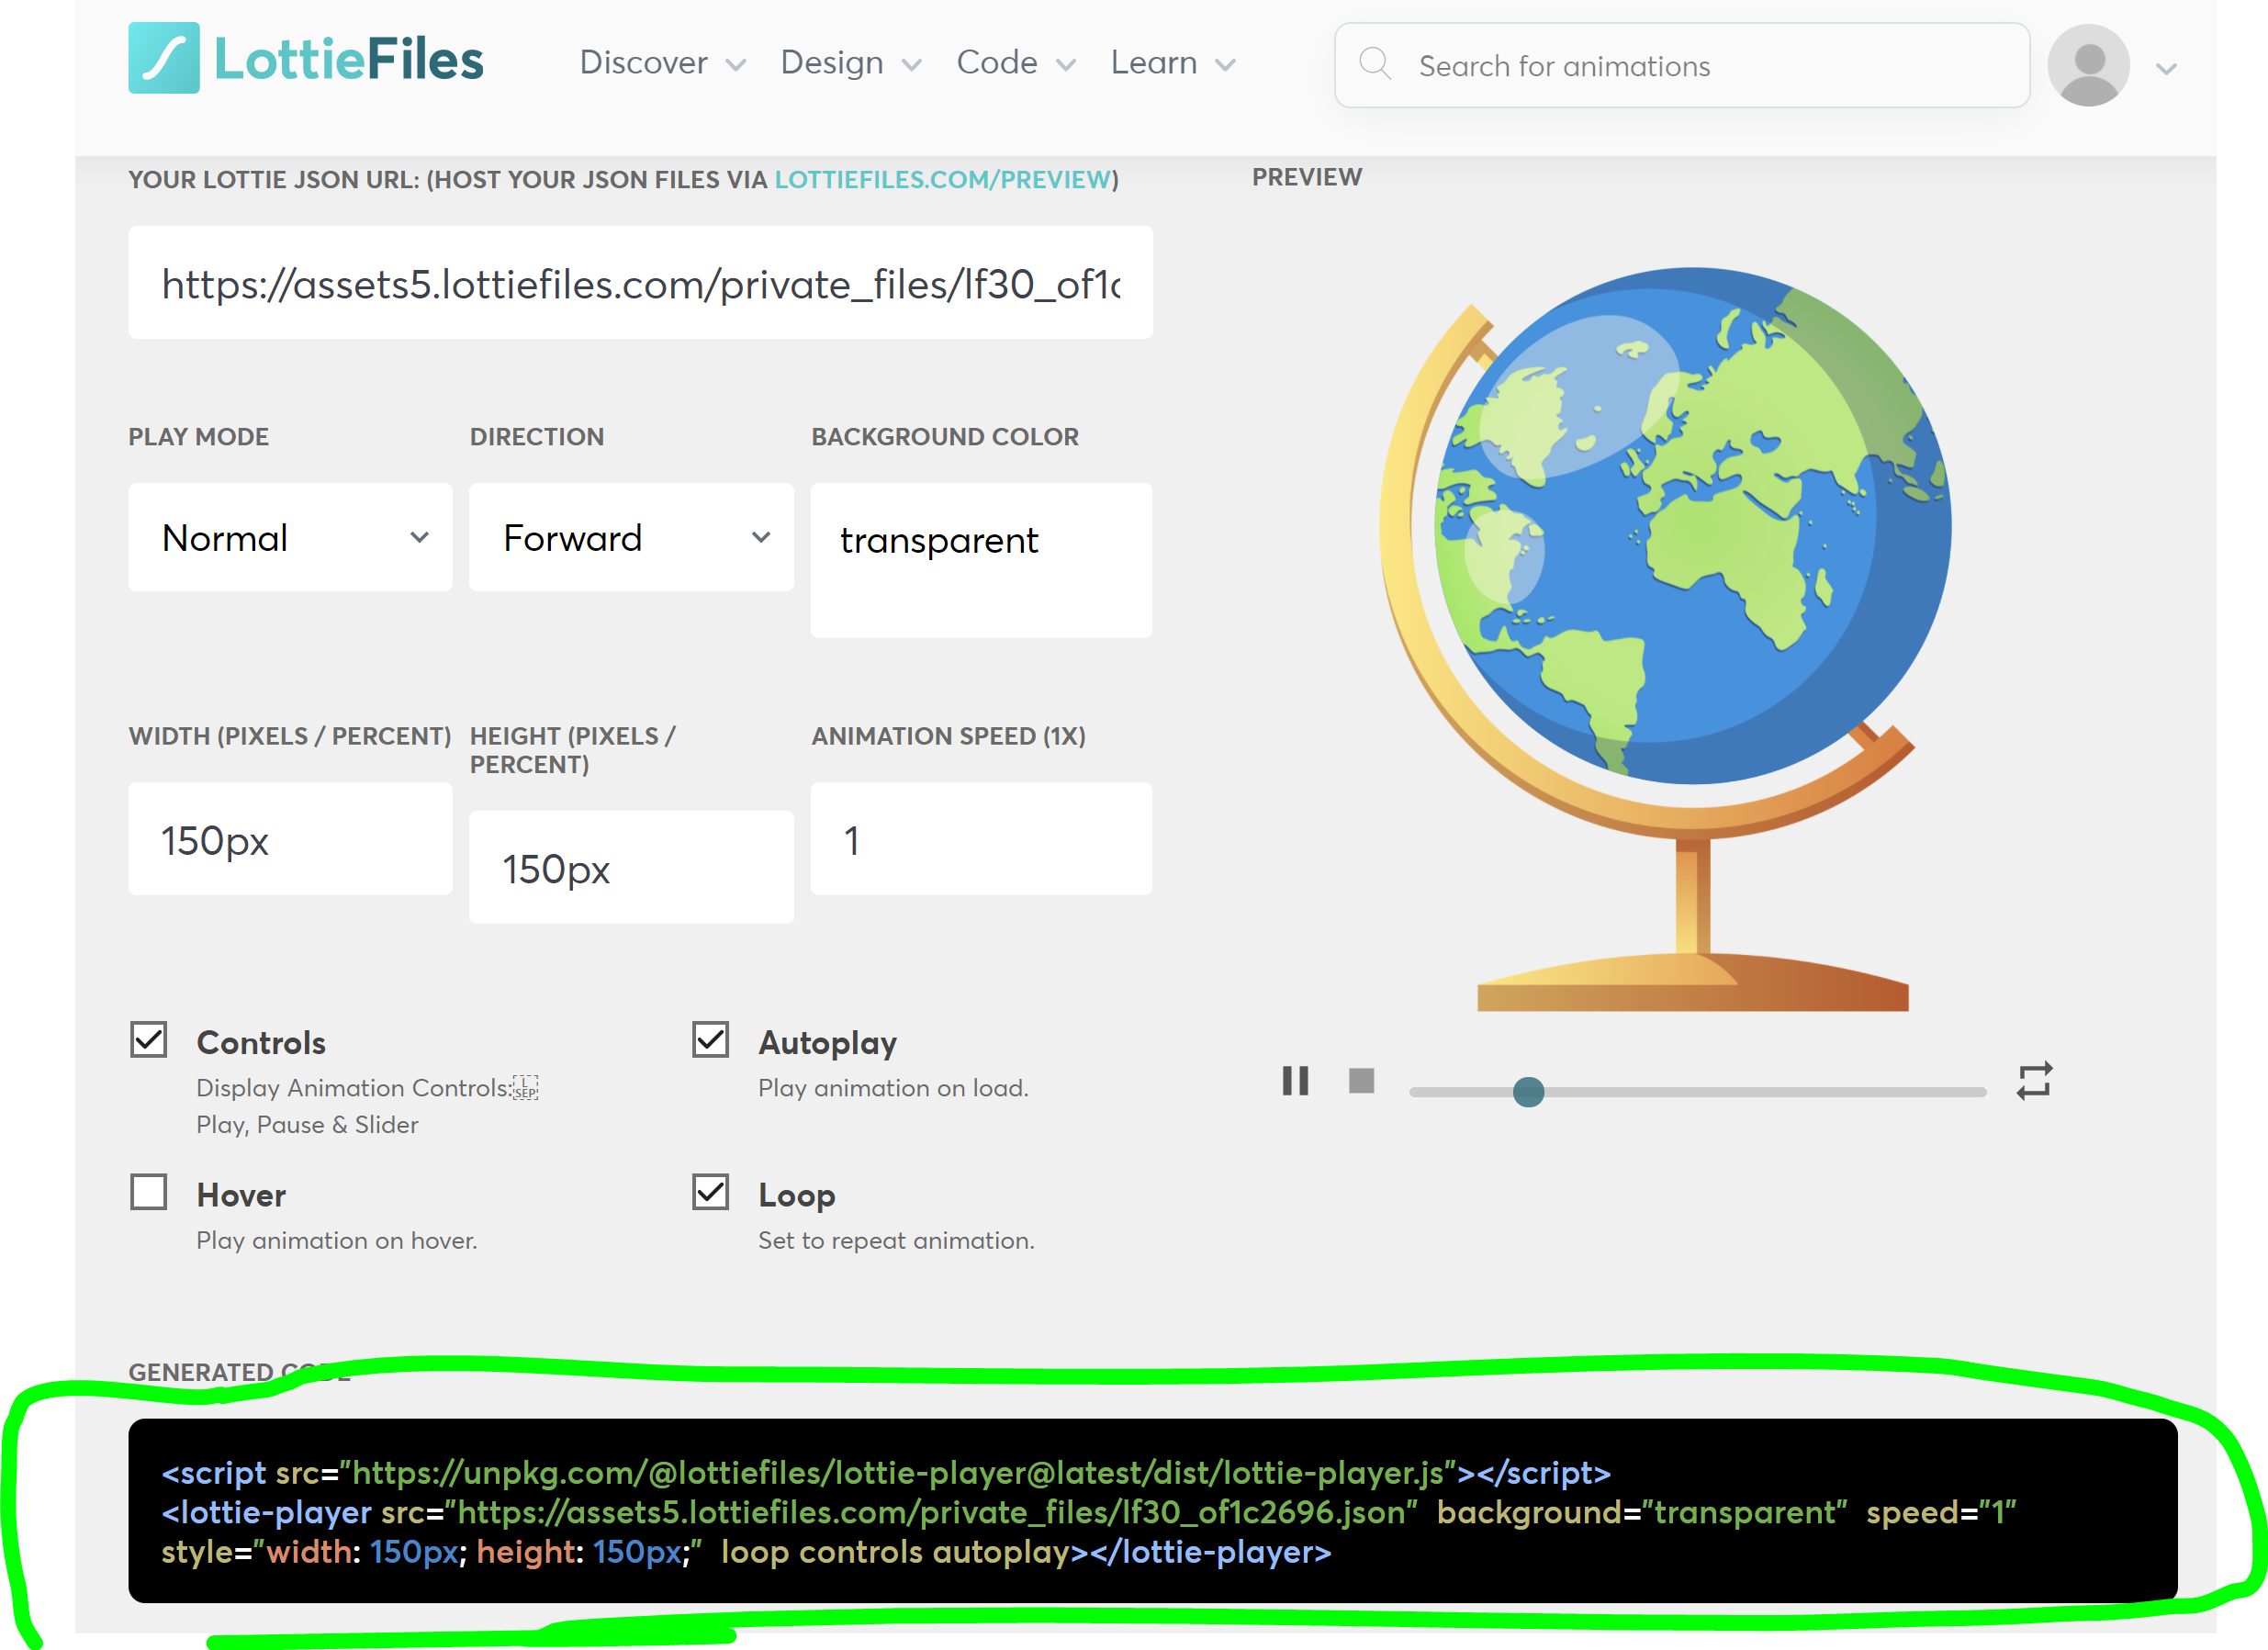
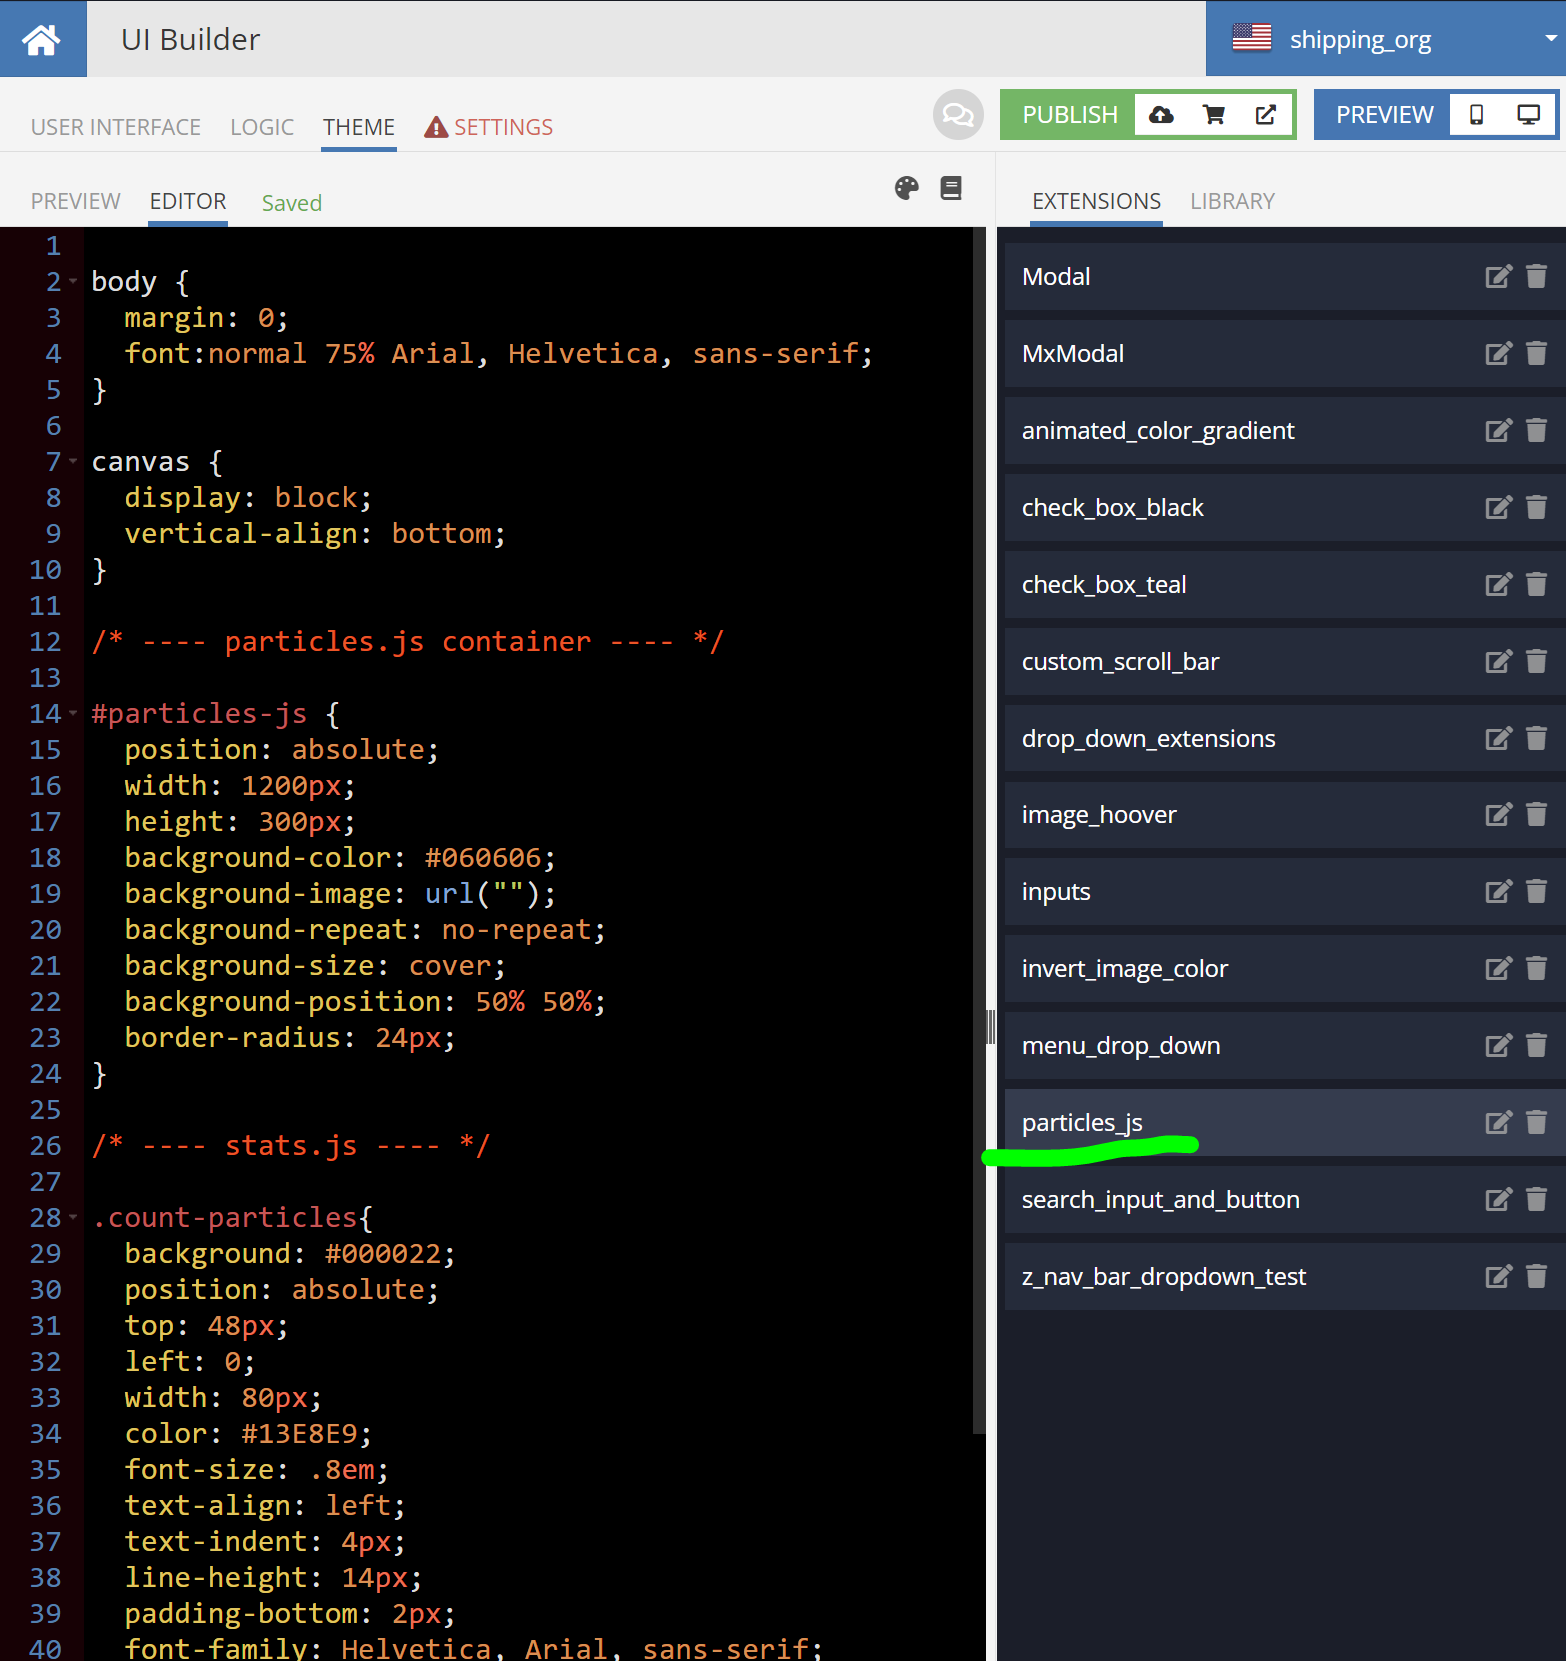
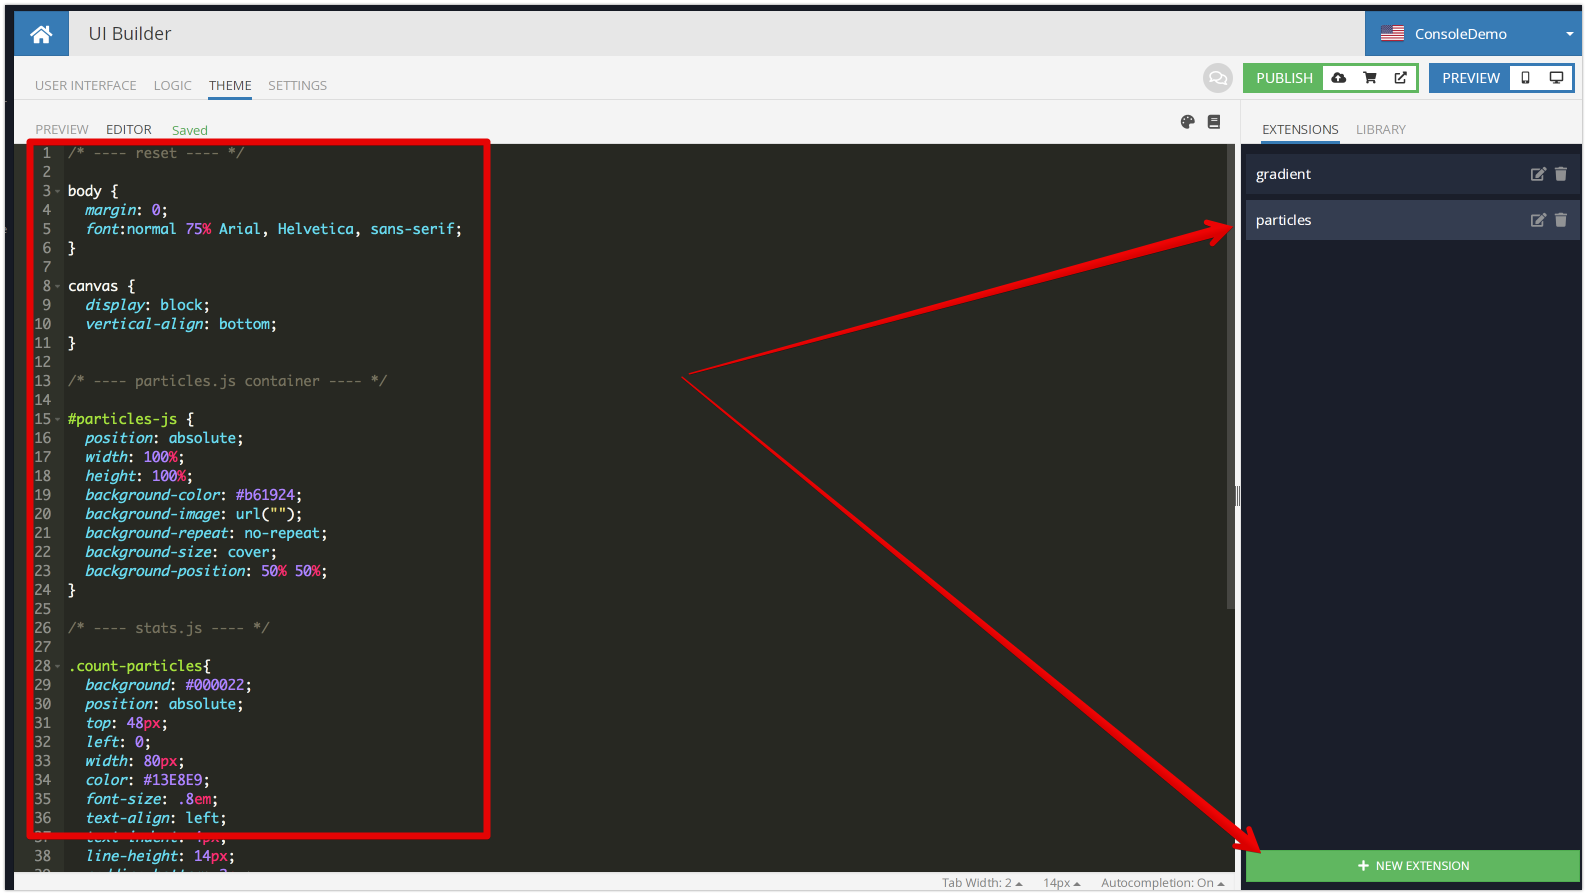
  5. Switch to the THEME tab, create an extension and paste the following CSS:

/* ---- reset ---- */

body {
  margin: 0;
  font:normal 75% Arial, Helvetica, sans-serif;
}

canvas {
  display: block;
  vertical-align: bottom;
}

/* ---- particles.js container ---- */

#particles-js {
  position: absolute;
  width: 100%;
  height: 100%;
  background-color: #b61924;
  background-image: url("");
  background-repeat: no-repeat;
  background-size: cover;
  background-position: 50% 50%;
}

/* ---- stats.js ---- */

.count-particles{
  background: #000022;
  position: absolute;
  top: 48px;
  left: 0;
  width: 80px;
  color: #13E8E9;
  font-size: .8em;
  text-align: left;
  text-indent: 4px;
  line-height: 14px;
  padding-bottom: 2px;
  font-family: Helvetica, Arial, sans-serif;
  font-weight: bold;
}

.js-count-particles{
  font-size: 1.1em;
  color: #13E8E9;
}

#stats,
.count-particles{
  -webkit-user-select: none;
}

#stats{
  border-radius: 3px 3px 0 0;
  overflow: hidden;
}

.count-particles{
  border-radius: 0 0 3px 3px;
}

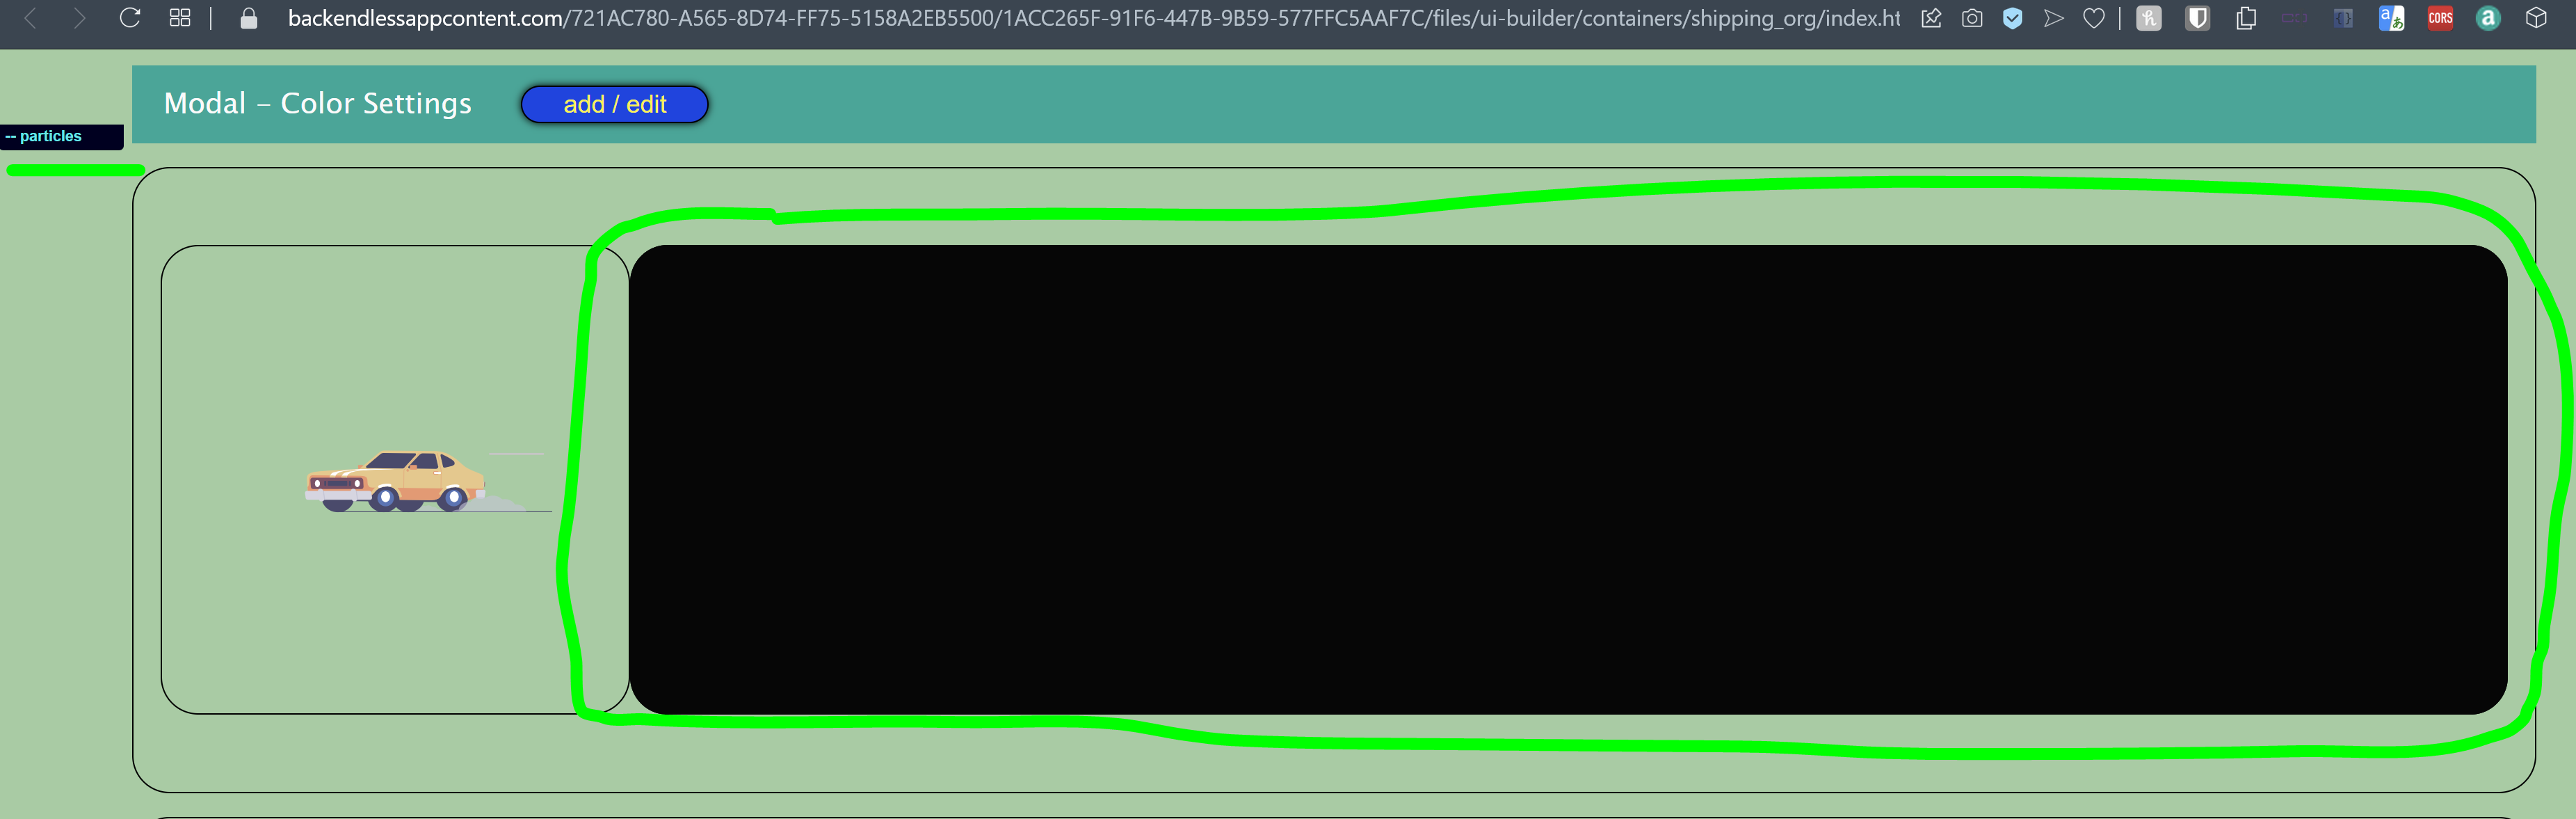
Your screen should look like this:

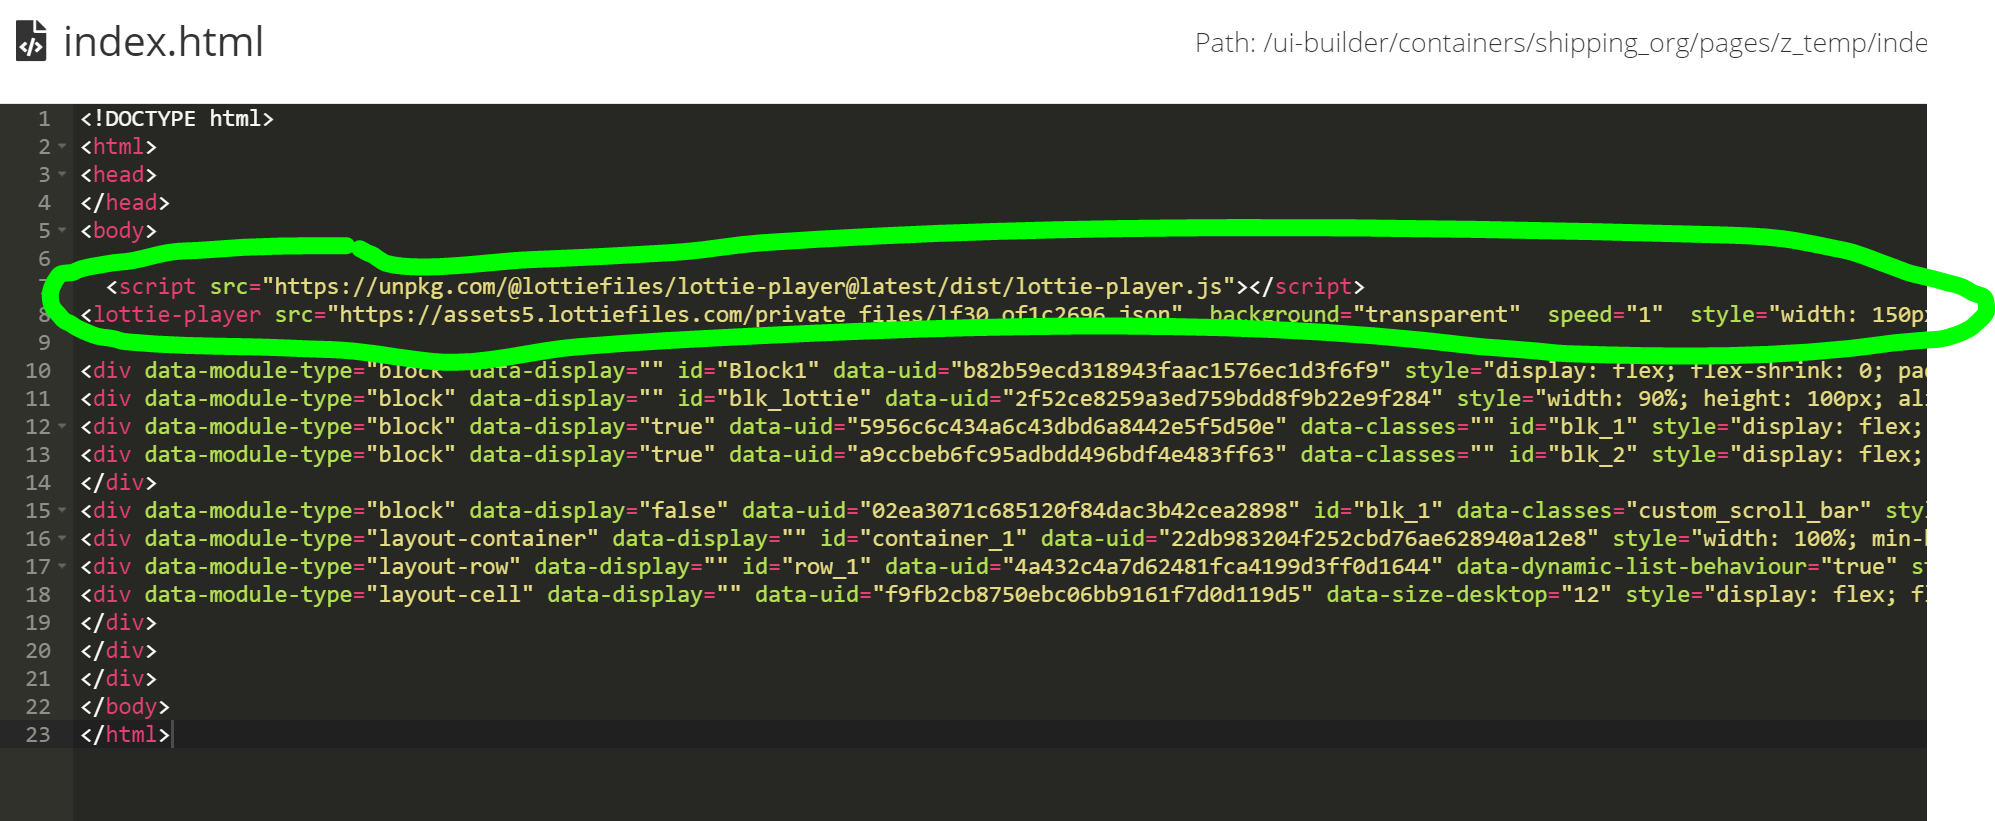
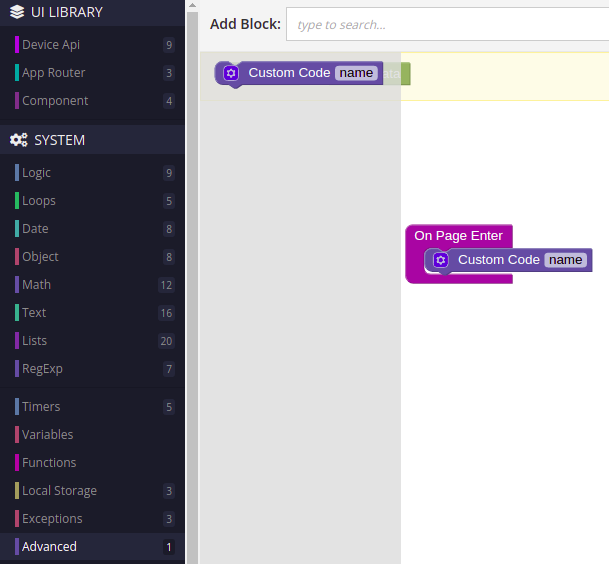
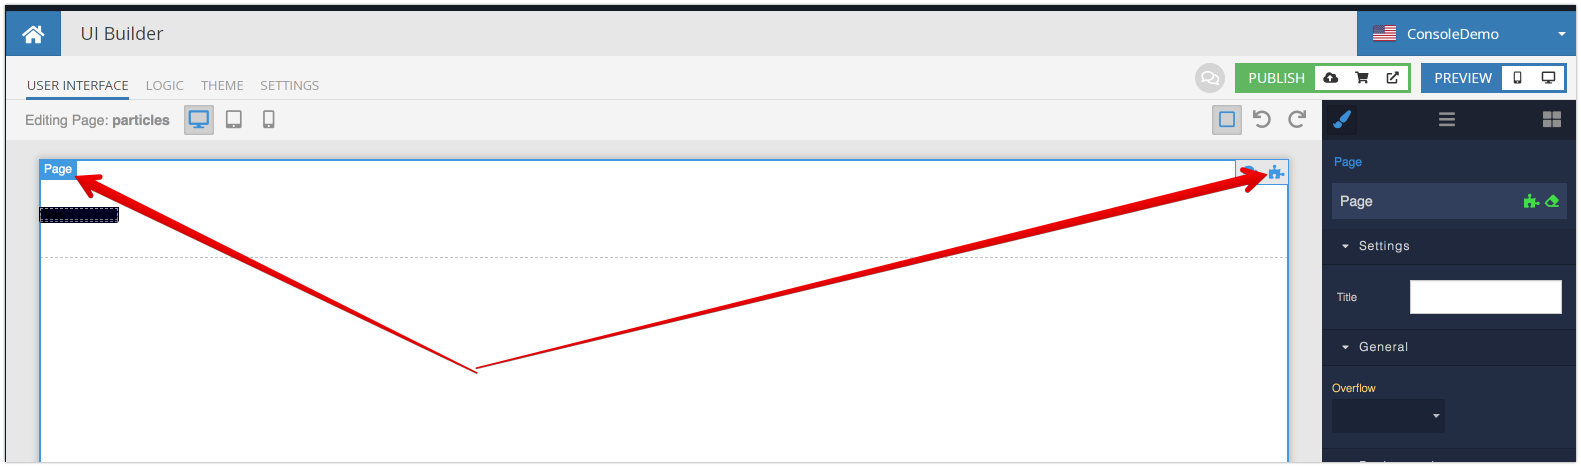
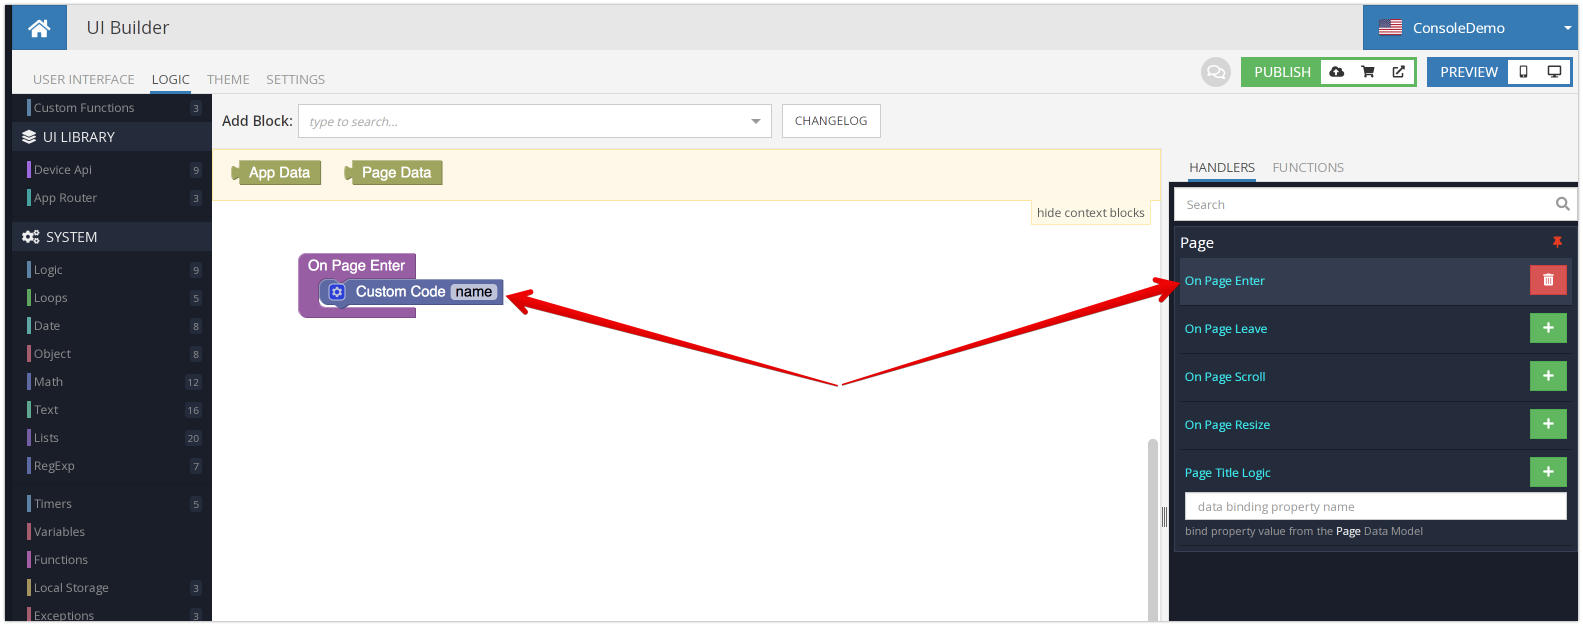
  1. Return to USER INTERFACE, select the page itself and navigate to logic for the page:

  2. Add the Custom Code block for the On Page Enter event:

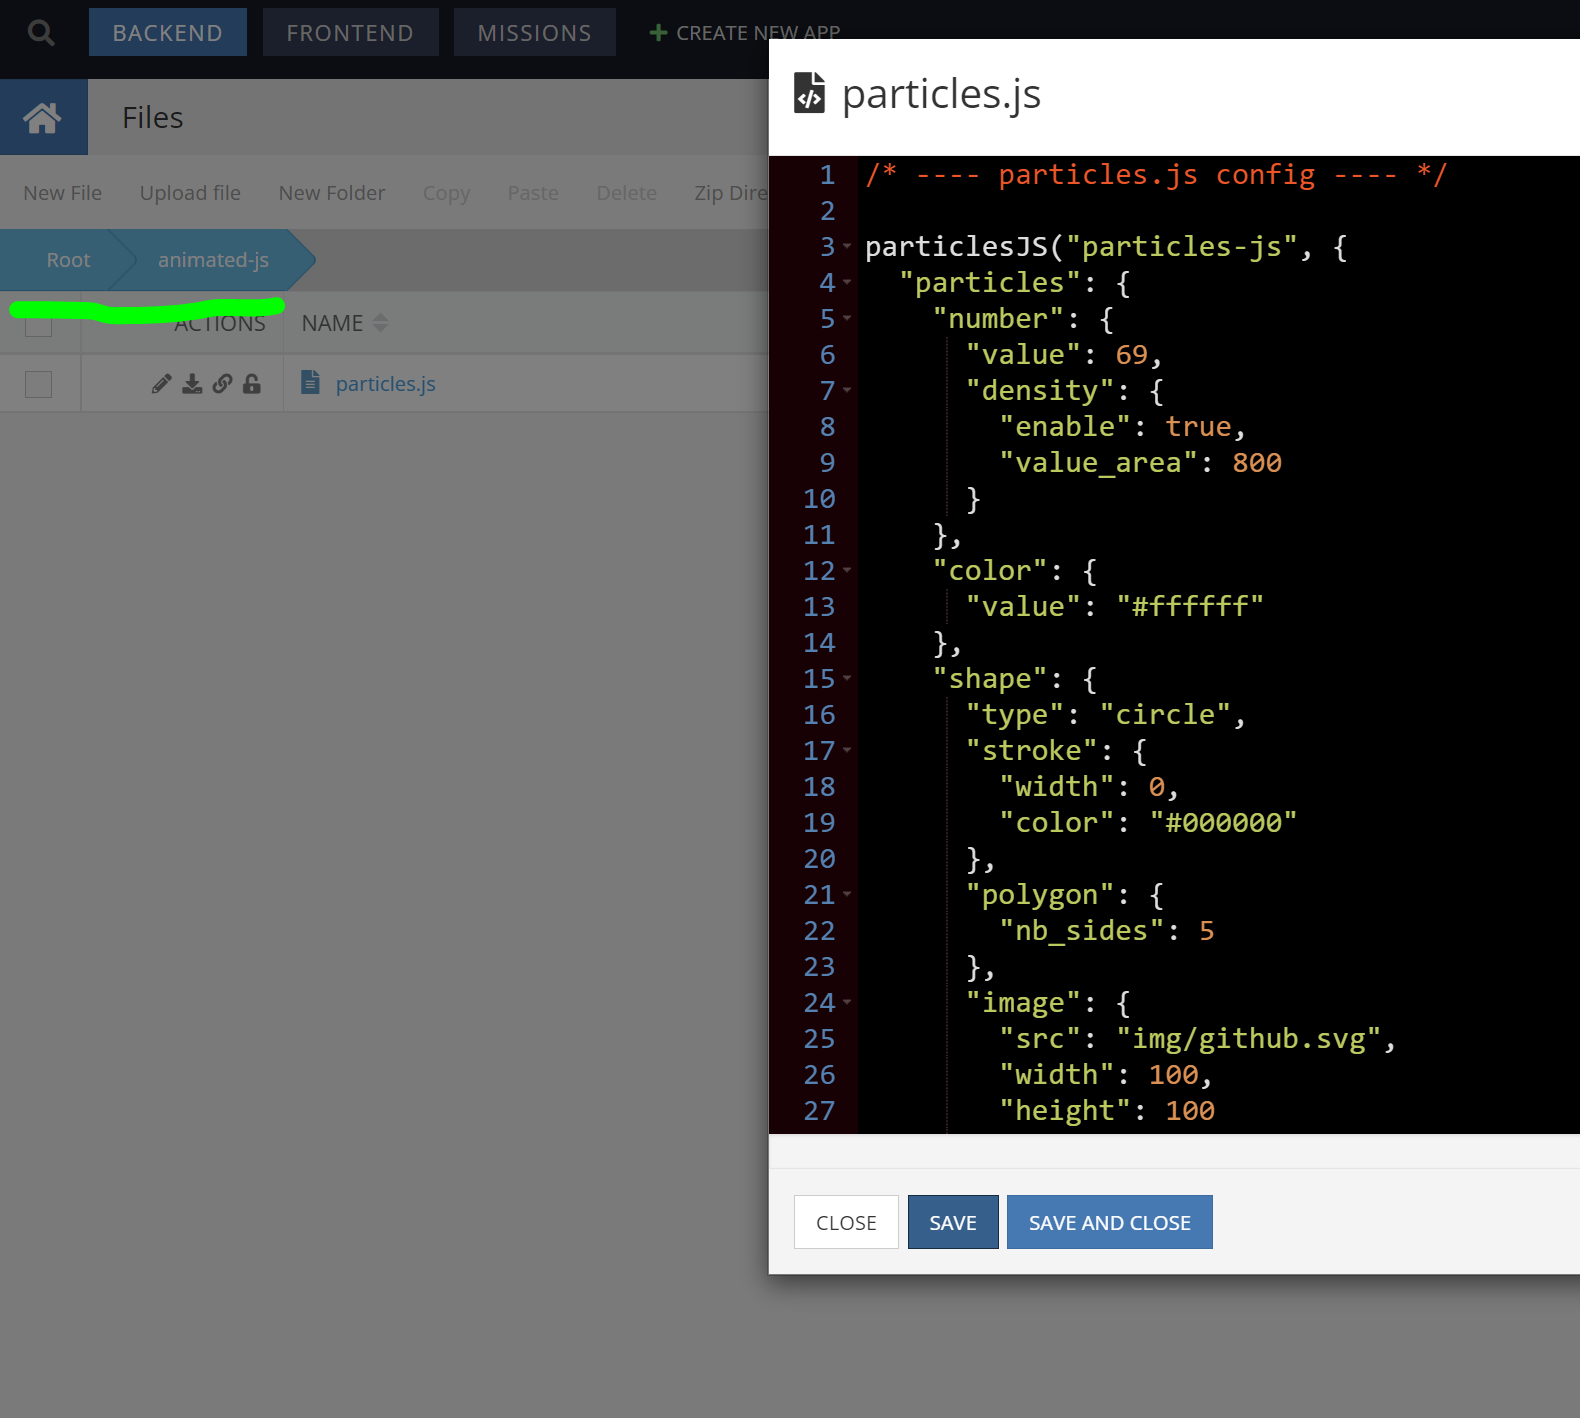
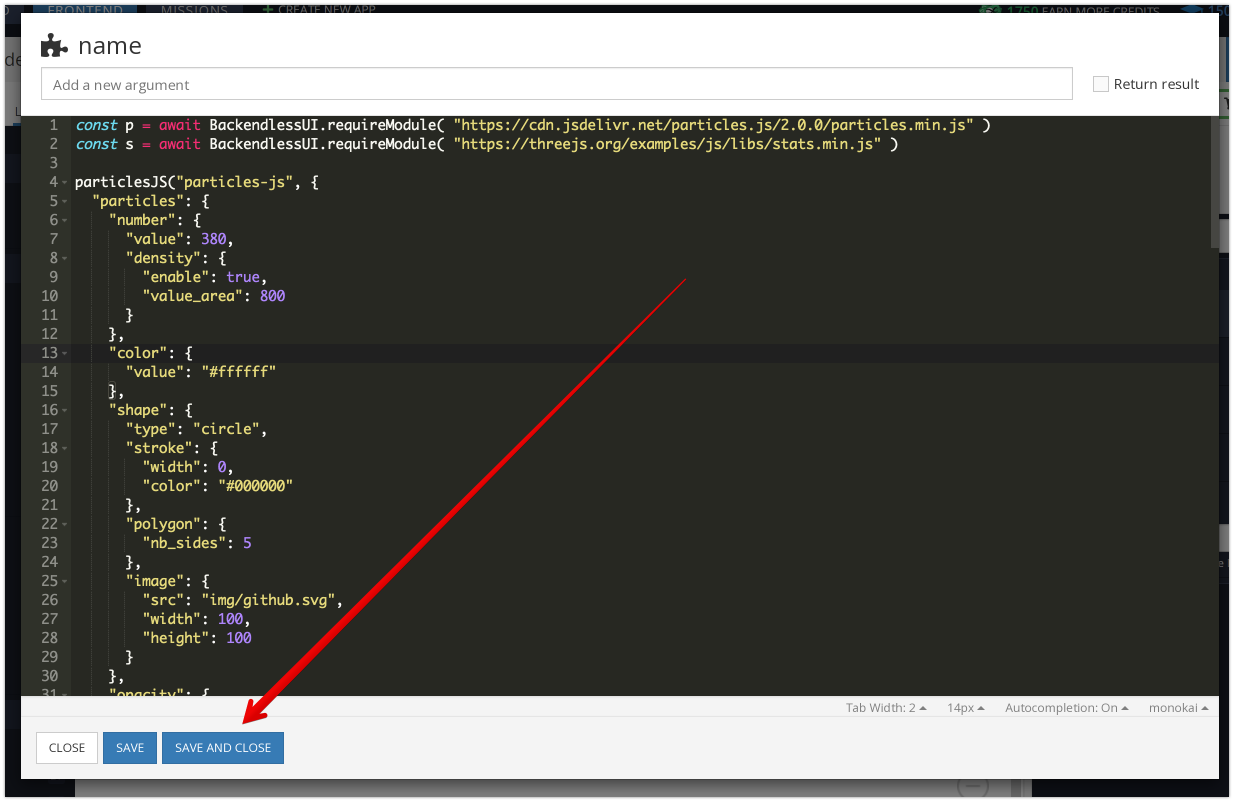
  3. Add the following JS code for the Custom Code block:

const p = await BackendlessUI.requireModule( "https://cdn.jsdelivr.net/particles.js/2.0.0/particles.min.js" )
const s = await BackendlessUI.requireModule( "https://threejs.org/examples/js/libs/stats.min.js" )

particlesJS("particles-js", {
  "particles": {
    "number": {
      "value": 380,
      "density": {
        "enable": true,
        "value_area": 800
      }
    },
    "color": {
      "value": "#ffffff"
    },
    "shape": {
      "type": "circle",
      "stroke": {
        "width": 0,
        "color": "#000000"
      },
      "polygon": {
        "nb_sides": 5
      },
      "image": {
        "src": "img/github.svg",
        "width": 100,
        "height": 100
      }
    },
    "opacity": {
      "value": 0.5,
      "random": false,
      "anim": {
        "enable": false,
        "speed": 1,
        "opacity_min": 0.1,
        "sync": false
      }
    },
    "size": {
      "value": 3,
      "random": true,
      "anim": {
        "enable": false,
        "speed": 40,
        "size_min": 0.1,
        "sync": false
      }
    },
    "line_linked": {
      "enable": true,
      "distance": 150,
      "color": "#ffffff",
      "opacity": 0.4,
      "width": 1
    },
    "move": {
      "enable": true,
      "speed": 6,
      "direction": "none",
      "random": false,
      "straight": false,
      "out_mode": "out",
      "bounce": false,
      "attract": {
        "enable": false,
        "rotateX": 600,
        "rotateY": 1200
      }
    }
  },
  "interactivity": {
    "detect_on": "canvas",
    "events": {
      "onhover": {
        "enable": true,
        "mode": "grab"
      },
      "onclick": {
        "enable": true,
        "mode": "push"
      },
      "resize": true
    },
    "modes": {
      "grab": {
        "distance": 140,
        "line_linked": {
          "opacity": 1
        }
      },
      "bubble": {
        "distance": 400,
        "size": 40,
        "duration": 2,
        "opacity": 8,
        "speed": 3
      },
      "repulse": {
        "distance": 200,
        "duration": 0.4
      },
      "push": {
        "particles_nb": 4
      },
      "remove": {
        "particles_nb": 2
      }
    }
  },
  "retina_detect": true
});


/* ---- stats.js config ---- */

var count_particles, stats, update;
stats = new Stats;
stats.setMode(0);
stats.domElement.style.position = 'absolute';
stats.domElement.style.left = '0px';
stats.domElement.style.top = '0px';
document.body.appendChild(stats.domElement);
count_particles = document.querySelector('.js-count-particles');
update = function() {
  stats.begin();
  stats.end();
  if (window.pJSDom[0].pJS.particles && window.pJSDom[0].pJS.particles.array) {
    count_particles.innerText = window.pJSDom[0].pJS.particles.array.length + " particles"
  }
  requestAnimationFrame(update);
};
requestAnimationFrame(update);
  1. Click the Save and Close button:

  2. Run your page, you should have the same rendering as in the demo I shared above.

Regards,
Mark

2 Likes

Thanks Mark there’s no way I would’ve figured that out… Nice to know your new block can handle this…

Hi Dima I’m getting the following error when I click this Lottie animation demo link… Can you please bring it back online? Thanks!

Restore it for you - link

Also, you could follow this instruction - link

1 Like